When you have them placed just where you want them then weld them together.
Tuesday, October 19, 2010
I decided on POOF!
When you have them placed just where you want them then weld them together.
Monday, September 27, 2010
Silhouette Studio
Found out a new neat trick…i have been playing around a little and have saved a couple of files. so I opened one up and, then because i couldn’t see what was in the other file (both named drawing?.studio) i drug the other file into the window and found that the whole file did not open but the shape was there in the already opened window, now along side the other first shape form the first file. Pretty Neat!
There are some really nice short cuts that I have run across so I thought I should share them in case someone has not yet figured them out. So open your software and go to Preferences under File Menu and change 1 setting under Advanced and go to Show Bezier Handles for and click the All Points. By default the Selected Points Only option is chosen.
Now draw out a circle by holding the shift key (standard) Make it a good comfortable size for playing with. Now double click on the line and you will have your edit point tool. You will have to be careful while this tool is selected because anywhere on the line that you click will make another point. Really Nifty! To get rid of any points you don’t want you can right click on that point and choose delete from the right click menu.
Click on a point and one quarter section of the circle will have a heavy dark red line and the point you clicked on will be white.
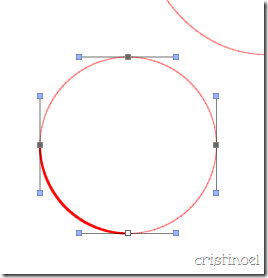
Your point editing dialog box should be open on your right so click on the corner function. Nothing looks like it is happening yet but when you move the handles (upwards till it lands on the line of the circle) on the point you will notice that is is forming a right angle….
Do the same with the same point other handle…
Here is what that finished shape looks like…
Now make an oval and do the same steps and you will have the beginnings of another tear drop shape which at this moment look like a sunflower seed...
Those blue handles closest to the ones you just moved will need to be moved to make the shape more like a tear drop…
then you can change to the other selection tool and copy and paste rotate (by using the little green knob at the top of the shape) and you have an eyelet grouping.
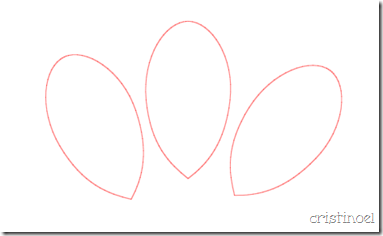
To adjust you spacing you can turn on the grid dialog and go tot he (which is the last one along the top to the right; it looks like a grid) and change the divisions to 16 and click show grid. I’m sure guidelines and rulers are coming but at the moment this is all we have but you can line thing s up quite well…
Now i am not going to do a complete eyelet edge because this is just to familiarize you with the procedures and the wonderful way this program handles the design aspects. From here you can do your own! ;) For now we will select the three shapes and make an edge around them by using the offset function which has grown some new attributes!! You have the offset window open yet? It’s right next to the Modify icon (the one with the m on it) and click on offset. If you get trigger happy on offset you will end up with several offset borders; you only need one. The default spacing for the offset shows up and is set at 0.250 inches. This is fine for what we want here but you can move the slider and watch it adjust as you move the slider. You can set it where you want for the next step.
Now double click on the offset line and notice the point for shaping….you can go ahead and right-click/delete each point along the bottom edge till your edge is nice and flat.
Now you can click on comer and move the end bottom edge points out till you get your corner where you want it and adjust the handles till you get the shape just right…
From here you are on your own. The sky is the limit!
Tuesday, September 14, 2010
Cropped Rock Wall cont.
I saw this nice little ‘journal’ I found at the Dollar Tree (favorite place to shop) and bought some and thought I could make some covers even though they looked nice already. So with that in mind I have yesterday’s project finish. I took off both covers and scanned the cover into my computer and cropped the image in Windows Photo gallery (the greatest for quick and easy fixes). From there I brought the .jpg file into Robo Master.
The actual size of this cover is 4 15/16 (4.94) inches tall and 5 inches wide, so this is what we make sure the cover size is, at least after we make all the holes and have them in their places. I didn’t make the .jpg any large, i just enlarge the view by pressing the ‘+’ key twice; this way the cover is large enough to move my ‘holes’, not to mention drawing out the circle and seeing where to place it.
Circles are drawn from the center in this program so you can see how good your are at finding center. when finished press the ‘–’ key on the keypad to reduce the size of the working view. Don’t get rid of the .jpg file, this will help in the placement of the holes. after you have minimized the view the drag a selection around this and group the jpg and holes together.
Then you want to make a 6 inch square and center the .jpg in the center of this, group all together and line it up for cutting. You will want to add in your carrier mat if you haven’t done that yet. And now you can un-group this and make the lines of the 6 inch square another color and mark it for not cutting in the settings dialog box. The other choice you have is to fill this square with color and in the line settings click on ‘no line’ (way down at the bottom of the drop down list) so that it doesn’t cut; re-group for safety’s sake. This file can be saved and used for other covers of the same size.
Place your paper (mine is BG’s Green at Heart) on the mat lining it up like in my photo (the red cutting line along the left and bottom edges). You will have to tape the paper to the carrier mat at the corners and halfway on each side. Cut! You can make your liners and back cover the same way.
Now you are ready to cover the front. If you are not good at doing the corners, you can fold the corners in till they are at the right angle, crease then glue them in place. Fold the long edges and glue them. I used a double sided tape runner to place a strip of tape just under the holes and press it into place before folding the corners and sides then used Mono Multi glue and let it dry a little before pressing into place. For gluing along the edge, run a line (light but not too light) of glue long the edge of the base and fold the paper over. This should spread enough glue to glue this edge down and trim your paper (while glue is drying) to just above the holes. Using a wet glue like this also softens the paper a little to help it fold into place and i didn’t have to deal with any wrinkles.
Now i have another shape for you…
This is my background (cotton ball applied distress inks) for the birthday party….
I hope that you can see the stamped details. I just thought it would be a little more interesting than seeing my hand painted version so i stamped them on a page from a book that had been crumpled and distress ink applied (vintage photo) then misted with water.
the table cloth is from a 12x12 sheet of BG Sugar Rush with painted details in off-white acrylic paint.
The plate of cookies and single cookie and cake were painted with distress ink
The grass is Silhouette file: border_woodland_grass_C00852_19210
Monday, September 13, 2010
Cropped Rock Wall
Another neat little feature of the Robo Master software is the clipping feature. And while it does require a little extra work you can still do something amazing! I did a rock wall for a Penny Black Stamp!
First you need to bring in you jpg file to be clipped. I used Bearly Mine Paper (freebie) that i like really well and would look really cute as part of the backdrop behind the stamped images.
after re-sizing the image (which wasn’t necessary for this) you want to click on the icon of a paper with scissors. the click on the closed spline tool and make your selection of the wall…
I hope you can see the selection I made. If not click on the photo for a larger view. The next step is to click again on the scissors icon and you will notice the excess paper disappear though the selection handles are still there.
This is where the extra work comes in because you will have to re-draw the outline of the wall again. But before you do that you should move you clipped image down where you want it and you can see that i added in a little bit of grass. these i will leave as is and color with Distress ink. Now you need to get the closed spline tool and re-draw around the wall, exactly on the edge, so that you will have a cutting line. After you have done that press on the plus sign on your keypad to enlarge the screen, click on the Edit Point Tool and make sure your line lines up along the edge of your clipped picture. I didn’t like this wall so I had re-done it but this photo will give you the idea anyway.
Next you want to run this through the printer and there are a couple of things for you to check before you actually print. If you are using paper that is a different size from the 8 1/2 x 11 paper you will want to change the size of your Robo Master and Printer page to match. You also want to make sure you have borderless printing checked on the printer settings. After you are done with your printing make sure your paper is lined up where i taught you here on your carrier mat, and cut.
My wall was off by about 1/16th of an inch too high but it is still good. I will have to work on this, but then i didn’t have my paper the right size and i had to eyeball it. So, really i didn’t do too bad. I just keep forgetting to make sure my paper is the same size. I used Dick Blick’s drawing paper and this after cutting it to 8 1/2 inches wide, forgot to make the height of the paper 11 inches. This is because i generally don’t have to be so exact but when doing this kind of cutting I do have to be exact. I put the design down at the bottom of the cutting area and when printing, the paper rolls through the printer till it gets to that spot and prints. If your paper is 12 inches it prints right where it was told but you have extra paper at the bottom. I could have trimmed it then to 11 inches but i didn't think of it. Really Dumb!!! because i had to line it up to the carrier mat. And my grass turned ot fine; I even colored some of the grass on the back side so I could fold the points down.
Tomorrow the finished piece.
Thursday, September 9, 2010
Polygon Tool
This may be a little useless tutorial because Silhouette has given a sneak peak on their new software and i don’t know if this tool will be available in the new program but it is such a useful little tool. I have a template that i want to convert to a cutting file and i could use the polyline tool but the polygon tool is even better for this.
I imported my .jpg scan of the template and I have not really goo line for tracing this file so I am going to use the polygon tool to trace around the perimeter. The first 2 clicks show only a straight line but when you mover you mouse you will notice it open into a closed shape. Just keep clicking the major points (this line does not curve).
If your template you are tracing is enlarged on the screen so that you cannot see the whole template at one time (as here)
and you have to move the screen, just use your mouse wheel while still holding the tool and scroll the screen up to finish the tracing.
I got to the last point where the line lined up perfectly aligned with the first anchor point and double clicked to finish my closed shape. I only had to adjust a couple of points (by using the edit point tool) and now i am ready to place my straight lines for scoring..
While drawing straight lines it is helpful to anchor at a further pint and move in on a line that to start where you left off on the last line you drew. Sorry my lines were drawn freehand paint brush and they are not very good but they give the general idea. After i finished laying in the score lines i selected them and grouped them then change the color and line properties.
The polygon tool is also great for doing the flaps on the boxes like the pencil box…
Wednesday, September 8, 2010
To Romeo and others….
Life gets frustrating at times. I had a very bad time getting this file to weld properly! It’s just the pencil box from the last project but it took me forever to figure out how to get it to weld without losing proportions as it would not weld even though the line lined up!. I had to add a smidgen of width to the piece that would not weld and then it went together perfectly! What a pain! And i had to download a trial version of CorelDraw! x5 in order to get it at all because Robo Master only adds and does not subtract. Now Corel is offering Draw! at 179.00 if i buy it quick but i don’t have them money and i am crying!!! They have added some really good hints to show how thing are lining up and a spline tool for making curves that is really out of site. So here goes a tutorial…I just have to share it…
First 3 points are drawn as shown by the dotted line and the squares are where i clicked the mouse to anchor the points. These point are for shaping and the dotted guide line is where you can add or subtract points to get a curve more to your liking,
here i have added another 2 points and ended by double clicking on the last point.
Here I have added a couple of guide line for helping my shaping. the blue line had already been added and the red show the last line i added.
Now you click on the shape tool to start shaping
where the guidelines and the spline guidelines are intersecting I am going to double click to add 4 new points.
You can see the shaping now. the spline line itself has jumped into position according to where i place new points.
by double clicking on the lower middle point I released the spline from the guideline and it jumped to where you see it. For more precise shaping of the spline shape you are creating you can turn on the grid and make 1/8 inch square to move the shape to amore pleasing shape.
So fantastic. and this is a new tool from my version. They also have a new way of reshaping a square – you have to click on the shape tool (and your square looks like this (bigger handles or points))
and then find the little convert to curves symbol…
Then you square looks like this….
And then by moving the bottom 2 points you can com up with this….
The rest of the shape stays in place! I hope i didn’t bore you with this, but I am just so excited and wish I had the money to get the program. Now, to make up for al the boring details i have a zip file with .svg, .dxf, and .gsd files of the pencil box i cut the other day. The zip file also contains a .jpg for those who have to cut by hand.
Now that i have done this, I need to go get my first cup of coffee (it is now 9:43am here), which i usually have before i do this kind of thing and get ob to the next project.
Saturday, August 21, 2010
Scoring with the Silhouette
Friday, August 20, 2010
A Little Exercise
Nobody is just dying to know what the spline tool can do? Alright Robo Master owners, let’s try a little something new! This is only for the adventurous as this little tool needs some taming. That is it seems to need a little taming. Really it is ourselves that need to get familiar with this neatest of all the tools in the tool box.
I must point out here that i am a self taught person here with computer drawing tools; really I don’t know that much but i made an eyelet edge with this tool. And it was sooo loonnggg ago that i ran across the spline tool that i don’t remember what program i found it in. That program is probably no longer available anyway. That was back in late Windows 3.11 or early windows 95 days. But when i bought the Silhouette, there was the spline tool. I cannot tell you how happy i was! anyway, here goes….
With your ROBO Master open and a new ‘sheet of paper’, no carrier sheet or grid at this moment, we will make a shape. Click on the closed spline tool and click once on your sheet of paper, pull down a bit (about an 1”) and click again,
then go to the right just a tiny bit and you will see the spline open up and become a loop. Quick - double-click to anchor that point, you can always change it later.
Now take your edit point tool and grab the lower little square (node or anchor point) and when your cursor changes to 4 directional arrow (cross hair pointer), click and hold down mouse button while you move that node to the left and up to where it is in line with the other lower anchor point, let go the mouse button and you should have a rain drop. Or eyelet. Or egg. Whichever you like to think of your shape as. If you didn’t, just try it again. It takes a little getting used to. You make to big a move or loop back on an un-anchored shape and you can come up with some pretty wild shapes and the feeling that you are not in control here, the shape is. You can straighten the line out by going back or delete and start over.
You can further refine this shape buy right clicking while your cross hair pointer is right over the line and add anchor point. If you want to delete an anchor point you hold your cross hair right over the point you want to delete. To make a spline come to a nice rounded, but sharper, point add and/or move anchor point close to the anchor point you want more pointed.
This tool is remarkable in that it makes beautifully curved shapes where the polyline tool (which is easier for a beginner to use) seem more tamable and easier to use but takes more time to shape curves. I used the spline tool to get my scallop line for the lesson the other day and here are some example shapes for other possible projects using the closed spline tool….
Now maybe you can do something better.