
Found out a new neat trick…i have been playing around a little and have saved a couple of files. so I opened one up and, then because i couldn’t see what was in the other file (both named drawing?.studio) i drug the other file into the window and found that the whole file did not open but the shape was there in the already opened window, now along side the other first shape form the first file. Pretty Neat!
There are some really nice short cuts that I have run across so I thought I should share them in case someone has not yet figured them out. So open your software and go to Preferences under File Menu and change 1 setting under Advanced and go to Show Bezier Handles for and click the All Points. By default the Selected Points Only option is chosen.
Now draw out a circle by holding the shift key (standard) Make it a good comfortable size for playing with. Now double click on the line and you will have your edit point tool. You will have to be careful while this tool is selected because anywhere on the line that you click will make another point. Really Nifty! To get rid of any points you don’t want you can right click on that point and choose delete from the right click menu.
Click on a point and one quarter section of the circle will have a heavy dark red line and the point you clicked on will be white.
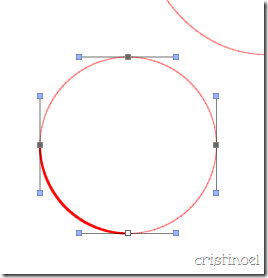
Your point editing dialog box should be open on your right so click on the corner function. Nothing looks like it is happening yet but when you move the handles (upwards till it lands on the line of the circle) on the point you will notice that is is forming a right angle….

Do the same with the same point other handle…

Here is what that finished shape looks like…

Now make an oval and do the same steps and you will have the beginnings of another tear drop shape which at this moment look like a sunflower seed...

Those blue handles closest to the ones you just moved will need to be moved to make the shape more like a tear drop…

then you can change to the other selection tool and copy and paste rotate (by using the little green knob at the top of the shape) and you have an eyelet grouping.

To adjust you spacing you can turn on the grid dialog and go tot he (which is the last one along the top to the right; it looks like a grid) and change the divisions to 16 and click show grid. I’m sure guidelines and rulers are coming but at the moment this is all we have but you can line thing s up quite well…

Now i am not going to do a complete eyelet edge because this is just to familiarize you with the procedures and the wonderful way this program handles the design aspects. From here you can do your own! ;) For now we will select the three shapes and make an edge around them by using the offset function which has grown some new attributes!! You have the offset window open yet? It’s right next to the Modify icon (the one with the m on it) and click on offset. If you get trigger happy on offset you will end up with several offset borders; you only need one. The default spacing for the offset shows up and is set at 0.250 inches. This is fine for what we want here but you can move the slider and watch it adjust as you move the slider. You can set it where you want for the next step.
Now double click on the offset line and notice the point for shaping….you can go ahead and right-click/delete each point along the bottom edge till your edge is nice and flat.

Now you can click on comer and move the end bottom edge points out till you get your corner where you want it and adjust the handles till you get the shape just right…

From here you are on your own. The sky is the limit!


